While feeding the spring-calving cows this morning on the upper place, I noticed a couple sections of the rail fence in the corral had come down under the weight of the deep snow over winter.
Seeing this reminded me that we had problems with the tailgate on the cattle chute last fall, and the head catch on the calf table hung up last spring, making it very difficult to catch a calf.
As we move to higher pastures in the spring, we use this facility to work the spring calves and their mothers – and then, throughout the summer, we use this complex to treat the occasional problem and preg check a few cows in the fall.
Because the facilities and equipment around here are all getting some age, I have had to make an effort to go through them a bit ahead of working cows and calves in order to find, repair or replace items that have worn out or been damaged, and we still have a few surprises.
Cattle chutes and facilities
It is easier to evaluate and maintain the facility and equipment if you begin by breaking down the system into its individual components and then looking at each component, making a list of necessary repairs needed. Try not to wait until the last minute, as some of these repairs or replacements may take a few days depending upon availability of parts, materials, labor pool, etc.
It is a matter of personal preference, but I like to start with the outlying holding pens and sorting alleys. Check the condition of the fences and gates. Repair weak sections of the fencing and make sure all gates swing easily and latch properly.
Nicholas Lee, manager of Rocking Horse Ranch located near Salmon, Idaho, says, “Tempers can really flare when you’ve got everybody together on a big cattle working day and one of the sort gates that you use to separate the calves from the cows quit swinging over winter. These things can also become safety issues.

If the gates don’t swing and latch properly, your help can get hurt struggling with a heavy gate, or when a cow shoves a gate over the top of them because there was no latch or it failed.”
After inspecting the holding pens and sort facility, check the alley system that feeds the chute. Again, you are looking to make sure the alley is secure and safe, gates swing and latch properly, and cattle backstops function properly and are not damaged.
If you use short poles or pieces of pipe to hold the cattle in the alley, make sure you have a good supply on hand, and that they are strong – not rotten or brittle.
Inspect the chute carefully. Most of our older chutes have processed thousands of cattle and been exposed to the elements 365 days of the year. Some damage caused by cattle is obvious and easy to see, but the damage caused by repetitive cycling of moving parts and rust does not always stand out.
As you begin the physical inspection of the chute, make sure the chute is set securely in order that it will not move away from the alley as cattle hit the head catch. If your chute sits on a concrete pad, make sure it is bolted to the pad. If it is not bolted down, drill the pad in the locations of the anchor bolt holes in the frame of the chute and insert expandable anchor bolts into the concrete pad.
Use locking nuts to secure the chute and grind off any of the threaded bolt above the nut to prevent operators and chuteside helpers from tripping on the exposed bolt. If you do not have a concrete pad, chain both sides of the chute frame to a secure post on each side of the alley at ground level.
Next, look over the chute for bends in the main framework, tailgate, side panels/bars and the headgate. Bent materials in any of these structures may inhibit the function of the chute, causing difficulty in the process of catching, holding or releasing a cow.
While you are looking for bent materials, look closely at the welded connections in these same materials. A broken weld in the frame structure, side panels, tailgate or head catch can cause trouble holding the cow at best and cause injury to the operator or chuteside help at worst.

Rex Morton, who ranches near Lemhi, Idaho, says, “We had trouble with the single-ratchet latch on the head catch of the old chute about six or seven years back. We were pregging cows, and Dan [Morton’s eldest son] was giving a shot to a cow when the head catch popped open. The sharp edge of the head catch caught Dan in the temple and knocked him down.
He only had a minor cut and a pretty good bruise, but it could have been worse. It turned out that the pin in the ratchet was worn and bent, but we didn’t figure that out for a few days.”
Inspect all of the moving parts of the chute: pivot points for the squeeze mechanisms, head catch and tailgate; locking mechanisms for the head catch and squeeze; and width-adjustment mechanisms for the head catch and squeeze. These points are subject to wear from repetitive motion and rust from exposure to the elements.
Check the pins or bolts at these points to see if they are in need of replacement. The initial problem caused by worn pins or bolts is rough or difficult motion of sections of the chute. When the pins or bolts finally break, parts of the chute can release, allowing the cow to escape or hang up and the operator or helpers to be injured.
Morton says, “The final straw that fall, happened when a wild cow pulled back hard against the head catch. The head catch released and she backed up hard, pinning the vet’s arm against the side bars. It didn’t break the vet’s arm, but we had to shut down for a bit until he could stand to use that arm again.
The boys made it pretty plain that if I didn’t replace that old death trap [the chute], they weren’t coming home to help anymore.”
Last, apply a film of light oil or WD40 to hinge points and ratchet locks. Do not apply oil to friction locks, as this will cause them to slide and release. Do not use heavy grease. Grease solidifies with exposure to sunlight and oxygen, causing moving parts to seize over time.
Calf tables and facilities
If you use the same facility to work the calves that you use for the cows, you have already reviewed the physical components of the holding pens, sorting alleys and the alleys feeding the table. Some of us use a separate complex for the calves.
This allows the cows and calves to be worked at the same time but also provides for a more convenient facility – built on a smaller scale to better accommodate small calves. As with the cattle facility, inspect the structure of the pens and gates to make sure they are secure and the gates swing and latch properly. Make sure the table is anchored securely in order that it will not move during use.

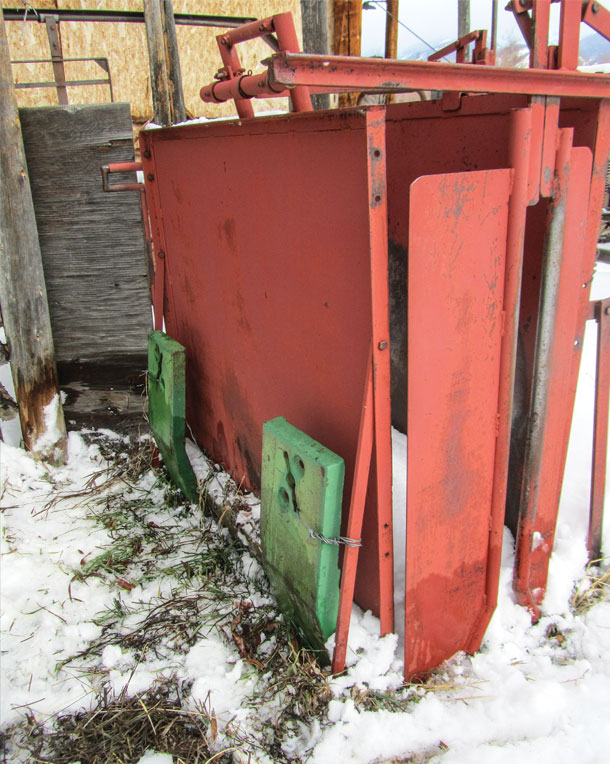
Lee says, “We attached a tractor front-end counterweight to the off-side of our table to help make it more stable when we tip a big calf.”
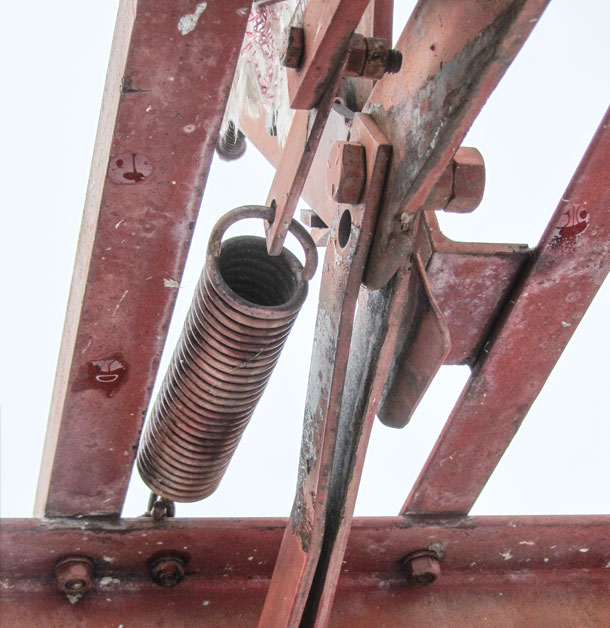
Continue by inspecting the calf table for bent structures and broken welds. Next, look at the pins and bolts of the pivot points. Calf tables rely on small springs or friction locks to hold the squeeze and head catch closed. Check to make sure these springs are not sprung, and keep an extra spring on hand for emergencies.
Last, apply a thin coat of light oil to the ratchet locks of the head catch and squeeze. Note: As mentioned previously, if your table uses a friction lock, do not oil this mechanism.
If you use an electric branding iron, make sure the extension cords you use are rated for the distance and wattage necessary to run the iron and any other accessories you use, i.e., clippers, dehorning iron, etc. A 10-gauge extension cord will carry sufficient wattage to operate all of these tools, but a lighter-duty cord that you may use around the home or shop will not supply enough power to the branding iron or dehorner.
If you use a generator, service the unit ahead of time, and make sure it will start and run properly.
Good luck with the spring cattle-working, and may the summer grass be plentiful. ![]()
PHOTO 1: A pivot bracket on a cattle squeeze that’s rusted and broke has been repaired and repainted.
PHOTO 2: A calf table head catch with pivot points and lube points. Note the extra spring added by the producer to keep the head gate ratchet locked in the closed position.
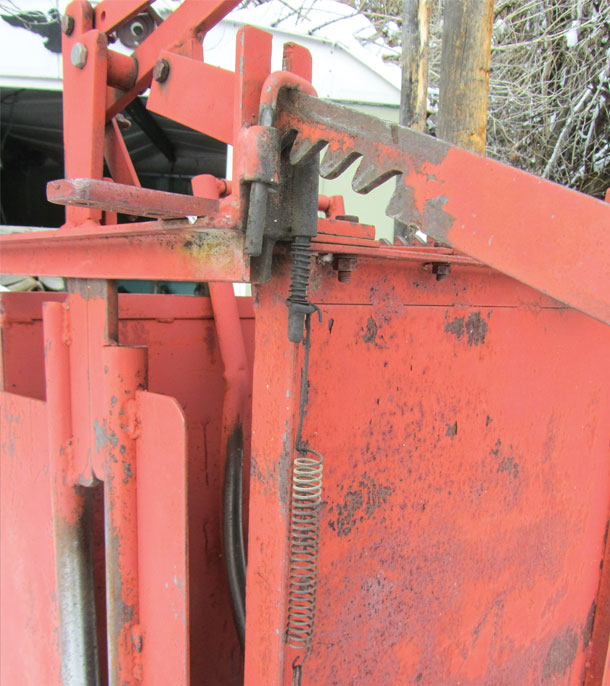
PHOTO 3: This adjustment lock mechanism on the cattle squeeze is bent, causing difficult use.
PHOTO 4: A producer added counterweights to the off-side of this calf table to add stability when tipping a calf. Photos by Michael Thomas.

-
Michael J. Thomas
- Freelance Writer
- Salmon, Idaho
- Email Michael J. Thomas


