So put us on speed-dial, send an email or letter. We love to hear from you!
Ever have baling and twine problems? It’s a pain, right? Reader Garry Brown from Genola, Utah, shares his ingenuity and homemade modifications that have helped him through the hay harvest.
Bale tie tool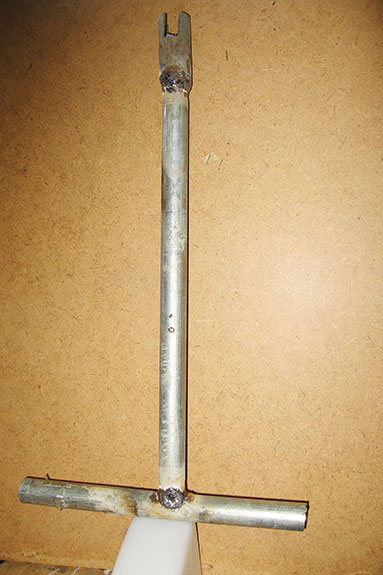
When a string is broken on a large bale and needs re-tied, this tool helps provide adequate tension. The tool is made out of half-inch steel pipe.
A shaft around 15 inches long is attached to a T-handle about 12 inches long.
Attached to the main shaft is a short end of ¾-inch pipe with a slot 1 inch deep and wide enough for the twine to fit in easily.
To use the tool, put the new twine around the bale and tie a loop that will not slip smaller in one end.
Run the other end of the twine through the loop and through the slot in the tool.
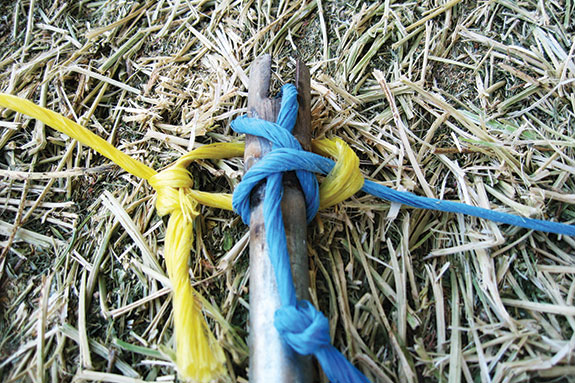
Rotate the tool toward the twine with the loop a few times to hold the twine securely.
Continue twisting the tool until the twine is tightened sufficiently.
To remove the tool and tie the twine, turn the tool backwards over the loop and hold it from slipping loose with one hand while removing the tool and tying the twine.
Modified self-propelled stacker to handle large bales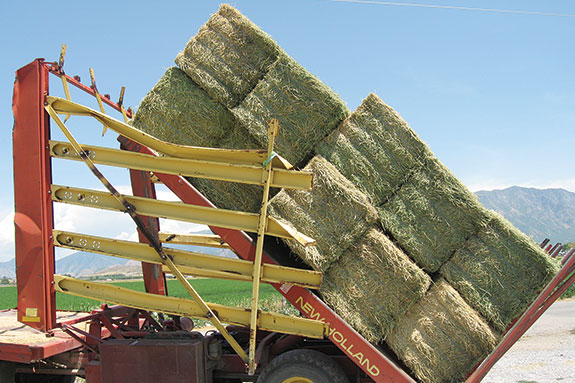
To use a self-propelled small-bale stack wagon on 3-foot x 3-foot half-ton bales, Brown removed the bale pickup.
He states, “We go to the field and raise the bed all the way up. With a loader we stack 10 bales (two piles of bales, five high) on the bed.
We lower the bed and haul it to where we want to stack it. It stacks just like small bales would, and we have a stack five bales high.
If we are stacking the hay in our barns, we use our large tractor loader that can stack six bales high.
Then we haul eight on the main rack and six on the front table, two bales high and three wide. These have to be taken off with a loader. We could put 10 bales on the main rack, but we then use our skid steer to load in the field, and five bales high is too high for it.”
For questions, you can contact Garry or (801) 754-3403.
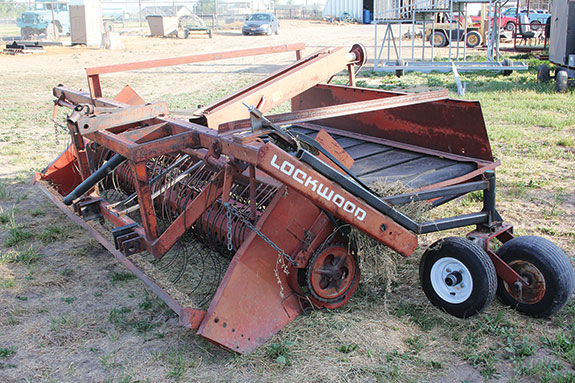
It was just coffee-shop talk (where all important decisions are made) where John Pitts of Filer, Idaho, grumped about the same problem the rest of the country had – how to get the hay dry enough to bale before the rain came.
Pitts wanted the regular baler pick-up system and a way to flip the windrow gently. The farmers suggested he modify a bean windrower.
Say what? That’s right, a bean windrower. Well, why not, said Pitts. So he bought a six-row bean windrower and went to work.
Pitts wanted to use his 30 hp tractor to pull it instead of the larger tractors, so he modified the carrier wheels by adding crazy (swivel) wheels so he can hook up just two points of the three-point hitch, which just picks up the front end instead of the whole implement.
The second set of wheels makes it so one wheel is always on top of the corrugate, eliminating the bouncing up and down. The bean windrower has a tined pick-up system similar to a baler, then the hay travels across the conveyor belt and is turned over.
In a two-pass system, two windrows are laid 2 feet apart, so that the baler can straddle one windrow while baling the other. Pitts can use this system to basically rake hay while the alfalfa is still fairly green – something he can’t do with the regular side-rake that twists the hay if it’s too green and prevents drying.
His bean windrower just fluffs up the hay and lays it over, cutting his drydown time by one to two days. By raking the hay earlier when it’s greener, Pitts says, the leaves are less likely to shatter and fall.
It was just that simple. For questions, email John Pitts.
Twine knotting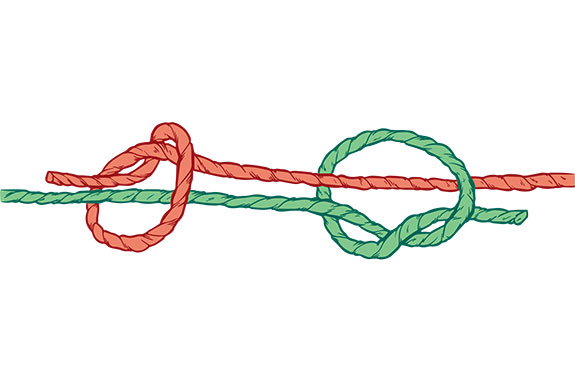
Brown states, “All of the baler manufacturers recommend using a square knot to tie rolls of twine together in the baler.
The square knot is called a square knot because the knot is square.
A knot with tapered ends would be better.” Brown shared a better way to tie twine ends together in a baler.
“Bring the two twines together. Take the first twine and tie a simple overhand knot around the second twine with the tail sticking out away from the knot.
Then take the end of the second twine and tie a simple overhand knot around the first twine.
Now pull on the two twines so the two overhand knots slide together as you pull them together. You can rotate them if necessary so they nest together nicely. You don’t need to pull this knot tight because it won’t jiggle apart and the ends are tapered.” FG


