High-quality hay has high nutrient concentrations, high digestibility, high intake potential and high efficiency of utilization. Determination of nutritive value by laboratory chemical analyses, spectral (light sensing) instruments or biological assays is a challenging process, but it is critical to a good marketing plan or allocation to the correct livestock class, if you feed it yourself.

Standardizing laboratory tests
The American Forage and Grassland Council (AFGC), the National Hay Association (NHA) and forage testing laboratories combined to form the National Forage Testing Association (NFTA) in 1984 to improve the accuracy of forage testing and build grower and consumer confidence. Since participation in the certification program is voluntary, not all hay testing laboratories are involved. Use of a laboratory that is not NFTA certified is not recommended.
Laboratories are evaluated and graded six times every year. Reference samples, including four alfalfa samples (one of which contains approximately 20 percent grass) and one sample each of corn silage and grass, are sent to each laboratory, which analyzes them using standard, accepted techniques.
Currently accepted techniques of forage analysis include traditional wet chemistry and near infrared reflectance spectroscopy (NIRS); NIRS is a newer technique that uses light reflectance. Although the initial investment for equipment is high, NIRS is quicker and cheaper than laboratory chemistry and gives equivalent results. Some laboratories will use only one technique, while others use both. Those laboratories within the specified limits are certified. Certified laboratories located in selected states are listed on the NFTA website.
Getting the most from a hay test
- Recognize the large natural variation in forage quality within a field, a windrow, a bale and within a stack.
- Understand the sources and magnitude of chance of error, which includes sampling, comparing forages with different moisture concentrations, between laboratory methods used for each parameter, between laboratories, between different batches; distinguish between analyzed versus calculated estimates; and realize quality declines with time and environment of storage.
- Follow correct protocol to core bales with an approved sample probe.
- Choose a NFTA-certified laboratory and stick with them.
- Know the range of normal values for important parameters.
- If a value is not what you expect, visit with the laboratory representative. They will probably rerun or resample. If you want to compare labs, ask them to send the ground sample they analyzed to the other lab.
- Understand there are no absolute values for parameters, just estimates and calculations.
Why is a hay test important?
Dairy, beef, equine and export markets utilize the majority of hay sales. Producers need to know the forage quality to be able to negotiate a fair price. Even when you use hay in your own feeding operation, you need to know the nutritional information for the hay or forage. Allocating the best forage to meet the needs of each class of livestock is possible by inventory and forage quality tests. The forage quality inventory will give you information on what nutrients should be targeted for purchase as supplements or what additional forage may be needed.
I recommend testing hay for neutral detergent fiber (NDF), digestible neutral detergent fiber (dNDF), crude protein, ether extract (fat), neutral detergent fiber crude protein (NDFCP) and ash. These components are required to calculate the summative total digestible nutrients (sTDN) that is used by most dairy nutritionists. I don’t recommend converting acid detergent fiber (ADF) to TDN as is commonly done for some markets, because the relationship is not good. I suggest that you ignore any calculation of net energy and TDN from ADF because we have much better equations now (e.g., the summative TDN).
Neutral detergent fiber digestibility (dNDF) is one of the most variable forage parameters. It can range from 40 percent of dNDF for highly lignified mature legumes to greater than 90 percent for relatively low lignified immature grass. Thus it has the greatest potential to separate forage quality into classes based on biological value.
I recommend the relative forage quality index (RFQ), which also uses dNDF and replaces the older and less accurate relative feed value index (RFV). The RFQ index provides a much better prediction for grass and grass mixed hays because the digestibility of NDF in grass hays is higher than in alfalfa, so RFQ will rate grass forages more appropriately than RFV. However, RFV and RFQ are only useful for allocation of a class of forage to a group of livestock, or for marketing negotiations. Nutritionists do not use RFV or RFQ in any ration balancing methods.
Ash levels greater than 10 percent indicate excessive soil contamination and will result in lower digestibility and respiratory issues for livestock consuming the hay and also suggest increased wear and tear on the baler, feeder and cows’ teeth.
Be sure to use a NFTA-certified laboratory. Either wet chemistry or NIRS methods are good with a certified laboratory.
The best evaluation of a hay sample is the combination of laboratory analysis and physical attributes assessed by sight, smell and feel. The eventual use of hay is critical to its correct evaluation and meeting the needs of the animal being fed. A comprehensive approach using modern equipment, methods and nutritional parameters is essential to estimating the nutritional value of forage.
Sampling guidelines for hay testing
The best method obtains core samples that proportionately represent the hay. Core sampling provides a representative sample to a laboratory, which grinds and further subsamples to a thumbnail-sized sample, 1 to 3 grams, representing multiple tons of hay (see Figure 1). The sample must represent the leaf-to-stem ratio, which varies throughout the bale, as well as the various weed compositions across the lot of hay. Each core sample should represent the individual bale, and enough cores need to be taken to represent the stack or lot.
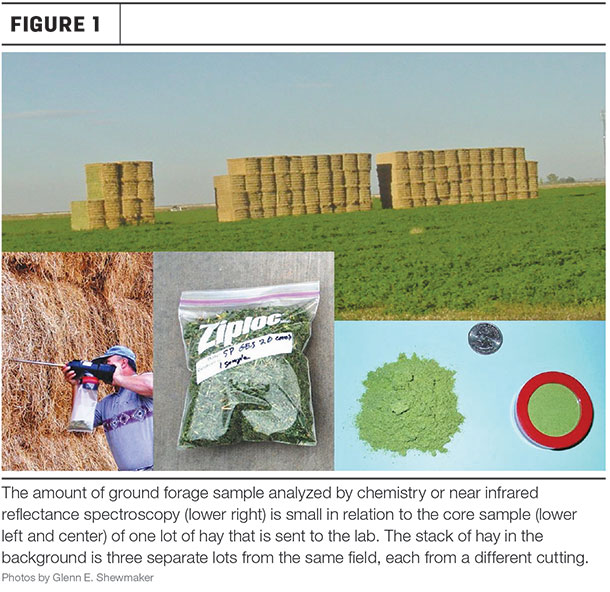
Individuals sampling should take at least 20 cores, sampling perpendicular to the butt end of the bales, inserted 12 to 18 inches into the bale, and handle the sample properly as described below. Forage quality declines with time even if optimally stored. A sample taken from the same lot of hay the day it is baled is expected to have lower fiber values than a sample taken from the same lot six months later. Sample as close to the point of sale or utilization of the lot of hay as is practical.
Coring guidelines
- Choose a good, sharp coring tool.
- Identify a single lot of hay.
- Probe rectangular bales from the butt end as near center as possible. Round bales should be cored from the curved side.
- Probes without a sample container must be emptied after each time the probe is inserted. With multi-samplers, the ramrod should be used after each sample to push the contents of the probe into the container.
- The goal is to take unbiased samples, either from random locations or predetermined systematic locations. A system of sampling the stack at regular intervals and sampling the entire length of the stack can provide 20 non-biased samples.
- Large or small bales require 20 cores (each from a different bale) to be representative of the entire lot of hay. A half-pound sample is about the right amount. Take more cores (20 to 40) in larger lots or if the hay is variable and divide them into subsamples based on the length of the stack.
- Collected core samples from one lot of hay can be combined into a single sample or in six or more cores per bag, providing three samples, and stored in sealed polyethylene freezer bags. Each container represents a forage sample, and should be identified by a date, cutting, forage type, location and owner. Some labs provide plastic sealable bags with labels that allow the above information and type of analyses desired.
- Handle the samples correctly. Do not expose the samples to heat or direct sun; keep the samples cool; and send them to the laboratory as soon as possible.
- Do not divide the un-ground sample to try to "check labs" because that will almost guarantee different results.
- Use a NFTA-certified lab and stay with them.
Choosing a hay probe
A hay probe needs to be used for sampling your hay; never use the “grab” or “flake samples” methods. There are many different types of probes, and each design has advantages and disadvantages. The following are some important considerations in choosing a hay probe:
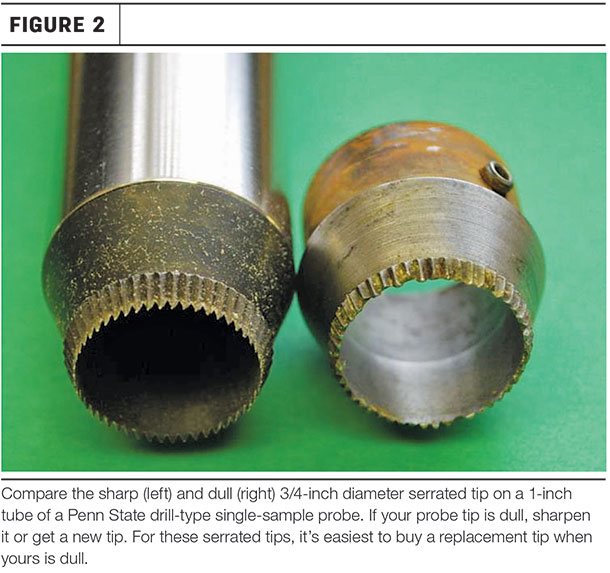
- Good, sharp tip; serrated or scalloped for drill-type; scalloped or straight for push-type; ability to sharpen and/or replace the tip (see Figure 2)
- Can be push- or drill-type; single or multiple sample container (see Figure 3)
- Ease of use and easy penetration into the bale
- Length of shaft 12 to 24 inches
- The collection of 20 cores from a 3/4-inch diameter by 12-inch deep core will sample a volume of 5.3 cubic inches, while a 5/8-inch diameter by 12-inch deep core will sample a volume of 3.7 cubic inches
- Has a collection container as a mechanism for core removal
- Ease of sample removal
- Produces about a half-pound (250 grams) of sample in 20 cores
- Durability and ease of transport
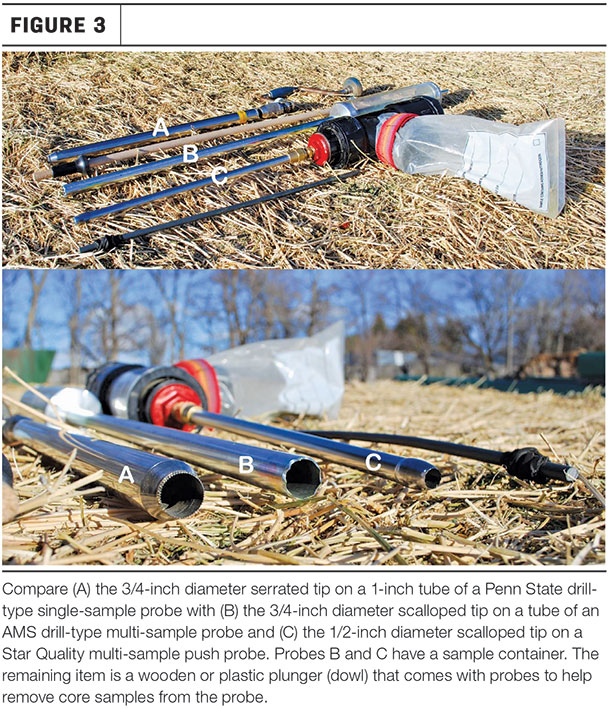
A sampler that holds up to 20 cores in a container, such as B and C in Figure 1, allows faster sampling than having to disconnect the drill and push out the sample from each core. NFTA lists hay probes on their website.
Each container represents a forage sample, and it should be identified by a date, cutting, forage type, location and owner. Some labs provide plastic sealable bags with labels that allow the above information and type of analyses desired. ![]()
References omitted but are available upon request. Click here to email an editor.

-
Glenn Shewmaker
- University of Idaho
- Kimberly Research & Extension Center
- Email Glenn Shewmaker