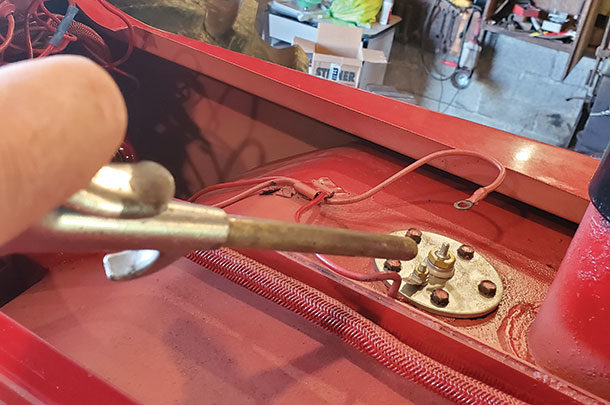
Please don’t take the title personally. One of the things I despised the most on the farm was a lying fuel gauge. If that gauge is stuck in a diesel tank, the consequences of running out of fuel can mean a series of bleeding and pumping exercises to reduce or eliminate air from the fuel filters, fuel pump and fuel lines.
I recently purchased an antique tractor. It reminds me of my more youthful days, days spent with Dad in the hay field when my only worry was … well, when I really didn’t have any worries.
One unfavorable thing about my new purchase, though, was: It had a lying fuel gauge. To be truthful, it was the best-case scenario of lying fuel gauges. It always read empty. While that is aggravating, reading empty at least made me think about when the last time was that I had fueled up. (With my memory being such as it is, that usually means I top off the tank just to be sure.)
In comparison, a fuel gauge that always reads full can get you into trouble. It’s only right in the time it takes you to pull away from the pump. I had a diesel pickup with just such a gauge. Another trait of this particular model is: The factory fuel lift pump that fed the engine fuel injector pump was prone to fail as well.
Exit 22. “What? Exit 22?” you say. “What about Exit 22?” Exit 22’s off-ramp is where my pickup’s lying fuel gauge deposited me one sunny morning. I managed to get the truck off the interstate and straightened up to make it easier for a roll back to pick it up – but by rolling it for the better part of a half-mile, I pretty much drained the fuel system, making the bleeding process much worse.
So lying fuel gauges and I have a history, and not one I want to repeat if at all possible. Therefore, it was worth a possible nick in the newly restored tractor’s paint job to evaluate the fuel gauge issue on the “new-to-me” piece of experienced iron.
Since the fuel filler and sending unit is dead center of the tractor’s “spine,” I did not have to remove the entire hood. Uncovering the fuel sender unit required the removal of six bolts and one panel. Exposing the fuel sender unit, I found that its removal only included unscrewing five mounting bolts with a 5/16-inch wrench, removing the “hot” lead wire with a 9/32-inch wrench and unplugging the ground wire.
While mine was already clean, before you begin to detach the unit, clean the area around it well. With the proximity to the filler, it would be easy over the years to build up all kinds of what I believe the technical term for is “gunk” (Photo 1).
With the area brushed and blown clean, I was set to remove the sending unit. As I prepped to remove the unit, I noted the ground wire looked a bit rugged. I unkinked the wire and heard a familiar click as the fuel gauge jumped to full.
This might have been great news but left me wondering, “Was that the issue? Was repairing the ground wire the only thing the gauge needed?” This led me to another issue: The tank really was full. Was the gauge working or did I just trade one lie for a worse one?
There are some great resources on the internet where videos walk you through the steps of repairing certain issues with a particular model or series within a brand or make. I googled a video that was helpful in that it outlined not only how to replace the sending unit, but how to test it to see if it was indeed the problem as well.
I removed the sending unit and brought it over to my shop bench to run the diagnostics. One thing to think about is: A fuel sender unit is under power full or empty. Checking if it has current going to it isn’t useless, but it only tells a small piece of the problem.
The way to test a fuel sending unit is by measuring resistance. Adding resistance regulated the flow of current from one place to another. Resistance was discovered in 1827 by German physicist Georg Ohm; thus resistance is expressed as ohms.
The more resistance a circuit has, the less current runs through it. Resistance is the check valve of electrical fields. In the case of fuel sender units, the less fuel in the tank, the more ohms of resistance the unit generates as the arm float moves down. The increased resistance causes the gauge to read lower and lower until the tank is out of fuel.
My video search (and, again, realize there is just as much bad info as good out there) led me to learn that my sender unit had a resistance of about 243 ohms at empty and 35 ohms at full. As I moved the float and arm of the unit back and forth between empty and full, the resistance should fluctuate at a steady rate between the values of 243 and 35 ohms.
Using my voltage meter, set to DC ohms, I placed the leads on the appropriate terminals of the unit. As you can see from the attached pictures, the unit responded correctly. The meter measured 242.4 ohms (Photo 2) at empty and 35.6 at full (Photo 3).
 Photo 2. Photo by Andy Overbay.
 Photo 3. Photo by Andy Overbay.
As I moved the float up and down, the resistance changed predictably between those two end values.
Conclusion: The sending unit was good and working properly. It had to be the ground wire. I returned the sender unit to its proper place and tightened it back. I replaced the wires and turned the key to “on.” It was back to reading empty. I worked the ground wire – no response.
As I dug into the wiring, I noted they were held firmly in place by a clip on top of the fuel tank. As I pried the clip up and worked the wires free, I noted that both the positive and ground wires were in bad shape (Photo 4).
 Photo 4. Photo by Andy Overbay.
I worked the hot wire, and it crackled as I did so. The gauge jumped to life or died as I worked it back and forth. I repaired the positive wire, and the gauge worked perfectly. The unit is actually grounded twice – once by the ground wire and redundantly by the five bolts that secure it in the tank.
The lesson? Treat the cause, not the symptom. I suspected the sending unit was bad and found the ground wire to be frayed, but the actual culprit was neither. Only with time and the compilation of evidence was the source of the lie revealed.
Too often, we throw money and parts at a problem only to find the problem was our lack of diagnosis of root causes, in machinery as in life.


