The forage analysis of hay, silage or haylage is one of a number of tools to use to determine the feeding quality of the forage being tested.
The basics of sampling are to get a small sample that is representative of the whole stack or silage pile and send it off to the forage lab.
Most labs will have a standard test package that meets the needs of most of those wanting to see test results to judge the value of the forage being tested.
There will always be variation in test results from lab to lab. Two labs using the same procedure on the same forage sample should get results that are close to the same.
The results will enable the end user of the forage to judge the nutritional content of the feed, to estimate the palatability of the feed and to see the mineral content of the feed.
The protein is usually reported as “crude protein.” Also listed are available protein and adjusted crude protein.
There is a special test available to sort out the heat-damaged protein that becomes indigestible as a result of the hay heating in the bale due to excessive moisture at baling. A crude protein result of 20 to 22 percent is seen as optimum for alfalfa hay.
The fiber is listed as ADF (acid detergent fiber) and NDF (neutral detergent fiber). The fiber is the cellulose in the plant stem. It is what tree trunks are made of and it is not digestible.
Alfalfa hay that is 30 percent or less ADF and 40 percent or less NDF will generally feed well.
The relative feed value (RFV) is a summation of the fiber in the forage that serves well as a guide to softness and palatability. The protein result is not used to determine the RFV.
Some labs also use the relative feed quotient (RFQ). This includes the protein result, which can give a result that does not accurately show the palatability of the feed because high-fiber hay can also be high in protein.
The RFQ works well as an indicator when used with grasses and silage. RFV versus RFQ can be a hot topic, so I won’t go further.
Lignin is one specific fiber which some end users consider the best indicator of soft, palatable hays. Note that forages too low in fiber (RFV above 185) may cause challenges to the end user as it is fed.
The minerals in the forage sample show the end user what, if any, supplements need to be added to the ration. Low-potassium hay, for example, is sought for dairy cows close to calving.
Note that forage labs can only give the correct analysis of the forage sample they receive. In getting the sample, care must be taken to see that the sample gathered is representative of the feed being sampled.
With this overview, let’s move to some regular questions I get in the field regarding forage sampling.
I already have a test on a stack of hay. Why does the buyer insist on pulling another test sample?
Most dairies and feedlots use a nutritionist to formulate the feed rations. The nutritionists generally have a “pet” lab they trust and use to formulate least-cost rations that will perform for the owner of the livestock. They insist on lab results from that lab.
There is a perception (unfortunately, it is sometimes true) that the test result coming from the grower may not accurately represent the hay being offered for sale.
I recommend that the test pulled by the grower specifies just the economy-result package from the lab. If a correct representative sample is pulled, the grower’s results should mirror those pulled by anyone else.
What kind of tool should I use to take a sample?
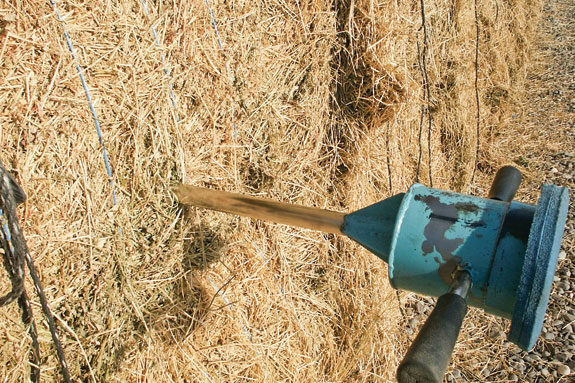
There are a number of hay core tools available. They consist of a tube, from ½-inch to 1-inch in diameter, and have some form of a sharp tip.
They should reach 18 to 20 inches inside the bale. These tools have some means of collecting the sample, which should be placed in a plastic bag and kept cool and shaded until it is sent to the lab.
For silage, grab representative hands full of silage from the face of the pile being fed and place it inside a plastic bag. It should be from silage freshly exposed and clean, taking samples across the face of the pit or pile.
How do I get a representative sample of a haystack?
If the field the haystack came from was not cut all in the same day, you need a sample for each day of cutting. Depending on the size of the haystack, core every third or fourth or tenth bale down both sides.
The sides of the stack are weathered. Won’t that affect the test?
Yes, but here is the way around it. Go down the stack and core the random bales about 8 inches deep.
Throw away what you collect in the sample tool. Now go back and insert the sample tool in the same holes you made, this time pushing the tool into the bale all the way.
This will give you a sample from the inside of the bale and eliminate the weather-damaged outside edge from the sample. This will also give you a clean sample if there is dirt blown onto the outside of the stack.
Which of all these numbers do the buyers look at, and what do they mean?
A buyer will mainly look at the crude protein, the fibers (ADF and NDF) and the RFV for alfalfa hay. For grass hays and silage, a test that specifies nitrates should be used.
The results are given both “as fed” and dry matter (DM). A high-moisture result can be a red flag for possible spoilage in the stack due to baling before the hay is properly dried.
Does it matter what kind of sample tool is used?
I have compared the narrow tool with the 1-inch tool and the results were almost exactly the same. The tip of the tool should cut any stem it encounters as it enters the bale.
That means keep it sharp. A tool that pushes the stems aside rather than cutting them and adding them to the sample will not make a sample that will represent the stack.
Is there anything that can throw the results one way or another?
Be aware that the sample you send in will be ground to a powder by the lab and then analyzed. If you happen to get a couple of small rocks or dirt chunks in the sample, chances are the lab will not find them and remove them.
Dirt will negatively affect the fiber results. (It will show the fibers higher than it really is.) After you bag your sample, rattle the bag on your fingers to shake any dust to the bottom.
Then turn the bag over to see if there is any dirt on the bottom side of the bag. If there is, you either hit a chunk of dirt while sampling or the haystack is dusty.
Years back, a group of FFA students were given sample tools and told to pull a sample from a large haystack.
Half were asked to take a representative sample; the other group was asked to take a sample that would show the stack to be better hay than it really was.
The results? None of the samples taken by the group trying for a higher test were out of the range of normal difference between samples, but some were noticeably lower than test pulled by the “representative” group.
I want to compare the results from two labs. How do I split a sample?
If you are close to one of the labs, they will have a sample splitter and will split the sample for you. If not, empty the sample on a clean flat surface.
With a clean straight-edge, separate the sample into halves. Then turn your straight-edge 90 degrees and split the halves.
The result should look like you just cut a pie into four equal pieces. Now consider your sample as a clock face.
Put the 12-to-3-o’clock portion and the 6-to-9-o’clock portion in one bag, and put the 9-to-12-o’clock and the 3-to-6-o’clock portions in the other bag.
If I’ve missed your question, throw me an e-mail and I’ll do my best to get you an answer. Brad Nelson. FG
